Copyright (c) UK 2005 Matthew Page. All rights reserved worldwide. http://www.photon.me.uk
This sharpening technique is designed to give a little punch and undo some of the softness inherent in the DSLR sensor. It is intended to be used from a RAW file (though may prove useful on JPGs straight from camera), where the RAW file has not been sharpened by the RAW processing software (i.e. Capture One, RAW shooter etc). The values shown are designed for a 100% output from the RAW convertor (i.e. not upsized). You'll need to play with the sharpening and edge creation values if you regularly upsize.
It is not intended to sharpen completely - you should still provide manual creative sharpening (such as around the eyes in portraits), and output sharpening where you set the sharpening according to the specifications of your output device, and the intended output size.
I've divided the process into four stages to make it more understandable.
Here we are going to sharpen the RGB channels individually. Because the bayer filter present on 99% of DSLRS (the Sigma using the Foveon chip being a notable exception) produces significant softening, we are trying to undo some of that softness.
Most bayer filters are constructed of RGBG (Red/Green/Blue/Green) pixels in a 2x2 matrix. So, the camera actually captures twice as much green detail as it does red and blue. The RAW software has to "guess", or interpolate, the missing 3 red pixels, 3 blue pixels, and 2 green pixels when de-Bayering the RAW information.
The USM process outlined here attempts to equalise the sharpness of all three channels.
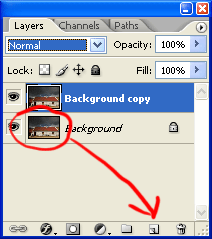
| 1. Duplicate the background layer. You can either press Ctrl-J (PC) or drag the background layer on the layer palette as shown. You should now see a "Background copy" layer. | |
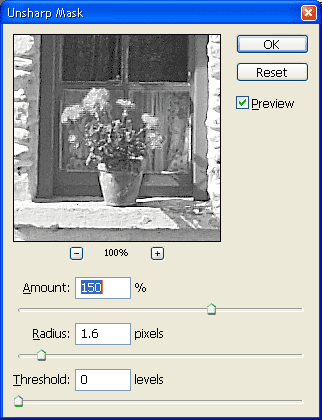
| 2. Select the Red channel. Either press Ctrl-1 (PC) or use the "Channels" palette and click on the Red channel. | |
| 3. Run USM at between 100-200%, radius 1.6, threshold 0. Use Filter / Sharpen / Unsharp Mask. | |
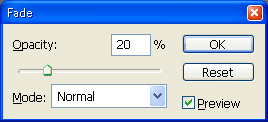
| 4. Select the Blue channel. Either press Ctrl-3 (PC) or use the "Channels" palette and click on the Blue channel. | |
| 5. Run the same USM and Fade. Press Ctrl-F to run the same USM. The immediately press Ctrl-Shift-F (or Edit / Fade) and fade to 20%. The blue channel doesn't need as much sharpening as the red. It usually contains a fair amount of image noise too, so the sharpening is much less severe on this channel. | |
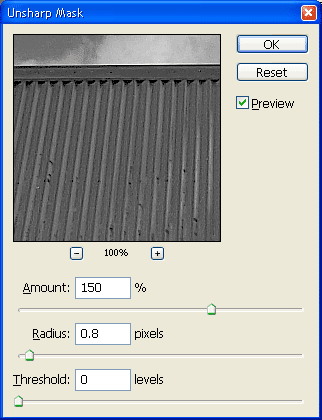
| 6. Select the Green channel. Either press Ctrl-2 (PC) or use the "Channels" palette and click on the Green channel. | |
| 7. Run USM at between 100-200%, radius 0.8, threshold 0. Use Filter / Sharpen / Unsharp Mask. The radius should be half that used on the Red channel. The values chosen were related to Pythagoras for the distance between adjacent like-coloured pixels ;-) | |
| 8. Select the RGB colour view. Press Ctrl-Shift-~, or press the RGB channel in the channels palette view. | |
An edge mask can be created that applies the sharpening only to non-smooth areas of the image. In fact, this technique can be used on its own for other sharpening processes.
| 1. Select the Luminosity channel. You can press Ctrl-Shift-Alt-~, or press the little circle on the channels palette. (Marked as "2" on the graphic.) You should now have lots of marching ants! |  |
| 2. Add a layer mask. On the top layer, press the layer mask icon (or use the menu Layer / Layer Mask / Reveal Selection) You should now see a black and white version of the top layer in the layer palette. Notice too that the MASK has a thick white line around it - this shows that any painting, filters, and adjustments will take place on the layer mask, and not the layer image. | 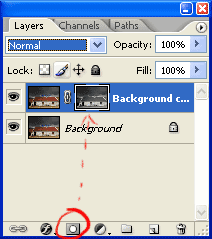 |
| 3. Run Find Edges filter. Use the menu Filters / Stylize / Find Edges | |
| 4. Run Minimum filter with value 2. Use the menu Filters / Other / Minimum and enter the value 2. This should "fatten" the edges found with the previous filter. | |
| 5. Run Gaussian blur with radius 3. Use the menu Filters / Blur / Gaussian Blue and enter the radius 3. This should "smooth" the edges. | |
| 6. Invert the mask. Press Ctrl-I (or Image / Adjustments / Invert). | |
| 7. Run auto-levels on the mask. Press Ctrl-L to call up the levels dialog, and click Auto. This will adjust the white and black points to make a strong mask. | 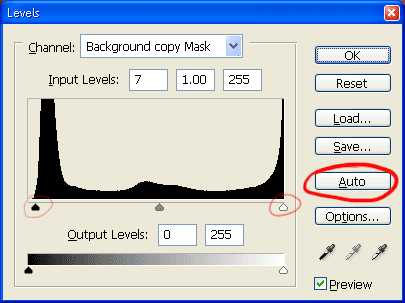 |
At this point you should have a well sharpened image where the sky, and other smooth areas, don't have too much added noise (or none!). You can compare with and without the mask by Shift-Clicking on the mask - it will have a red cross when disabled.
Additionally, if you want to examine the mask on its own, Alt-Click the layer mask. Photoshop will then show you the contents of the mask, and not the image.
To further improve the sharpening, we can control how much sharpening is applied to the highlights and shadows. This stage also helps when saving as JPG since there's not much point in having ultra sharp deep shadows and extreme highlights that you can't see and will only waste compression space in the JPG!
|
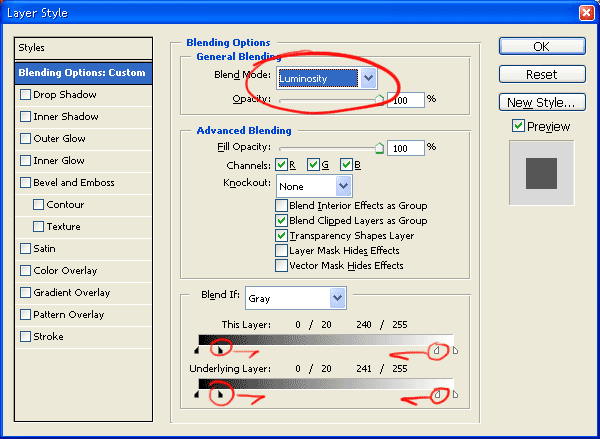
Open the blending options page. Either double click on the blank space to the right of the layer mask, or right click on the layer and select "Blending options..."
|
 |
Just to show you the kind of sharpening you get, here are "before" and "after" images, shown at 100%. They were taken from two parts of the image. They show, perhaps, rather hard sharpening to emphasise the effect.
 |  |
 |  |
1. Digital Outback Photo - Improving "Presence" in Digital Images
2. The Lights Right Studio (extra sharpening tools for Capture, Creative and Output sharpening)